It was like a first date! Garment Designer pattern making software decided to meet up with Projector Sewing. Interested? You already love the flexibility of digital pattern drafting and the custom fit that can result, but why not add a bit more technology to your skill set and move into the world of projecting your pattern onto fabric, aka Projector Sewing.
I had been following the Pattern Projection process for some time but never quite made the leap to walk through the entire process from start to finish. In this blog I will share my first pattern projection process with you. I am not going to get into all the options that exist with pattern projection (as there are many), just the choices I made, and why. See the References at the end for further reading and research.
So… What is Pattern Projection ?
Pattern projection involves creating a full-scale PDF file of your pattern and then projecting the image onto your fabric, calibrating the scale to make sure it is accurate, and then cutting the pattern out with either a rotary cutter or scissors. No paper pattern! It takes a little mind bending to think through the process, trust it, and then adjust to the fact that you may need to move the fabric as you are cutting to accommodate all your pattern pieces.
Early Considerations
The following are some things you need to think about at the onset of getting into Projector Patterns.
- Where will I do this? The first step in your pattern projection process is to determine where you are going to be doing your projection and cutting in your home. This becomes a necessary consideration, as in my case, the type of camera I would purchase depended upon the distance i have between my ceiling and my cutting table.
- Permanent or Temporary? Next, I needed to decide if the camera would be in a permanent position or temporary (meaning it may be moved between projects, which means re-calibrating the scale each time). I preferred it to be rather permanent as the thought of re-calibrating seemed like a task (which in the end it was not).
- Choosing a Projector and Mount– For me, this was the hardest part of the entire process and to be truthful, the part that held me back for so long. There is a broad range of projectors out there, each with their own offerings, and there are a lot of terms you will read about online as you explore the resources for Projector Patterns.
Fortunately for me, I had met Sheredith Hardy, owner of ProjectorSewing.com at the Puyallup Sewing Expo a year ago. She has become a wealth of information for me and helped walk me through the thought process of choosing the right projector for my situation. Her web site is full of helpful information, tutorials, videos, and even an online class.
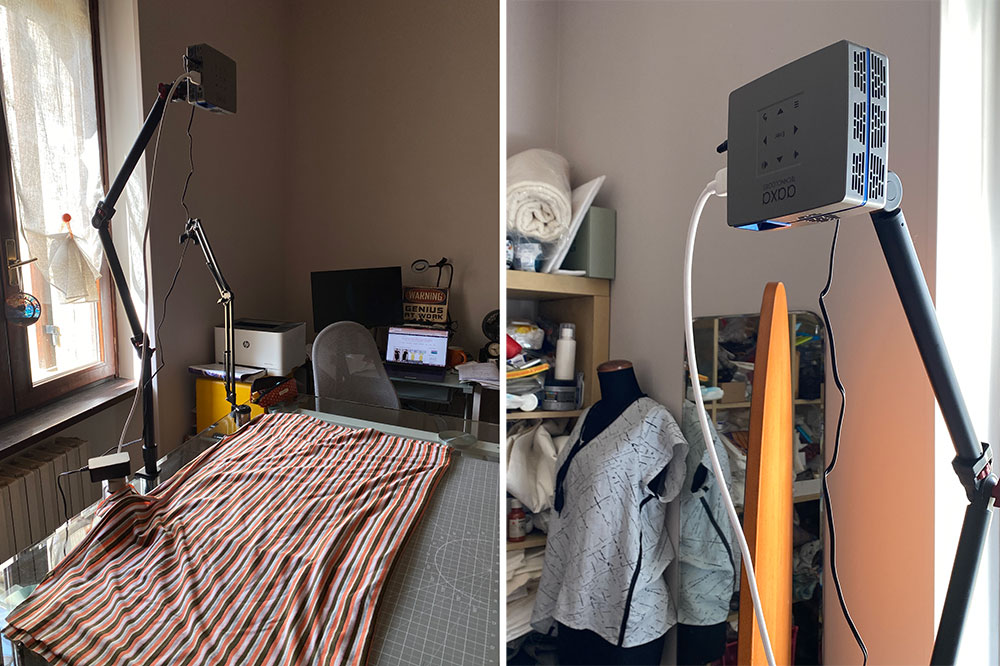
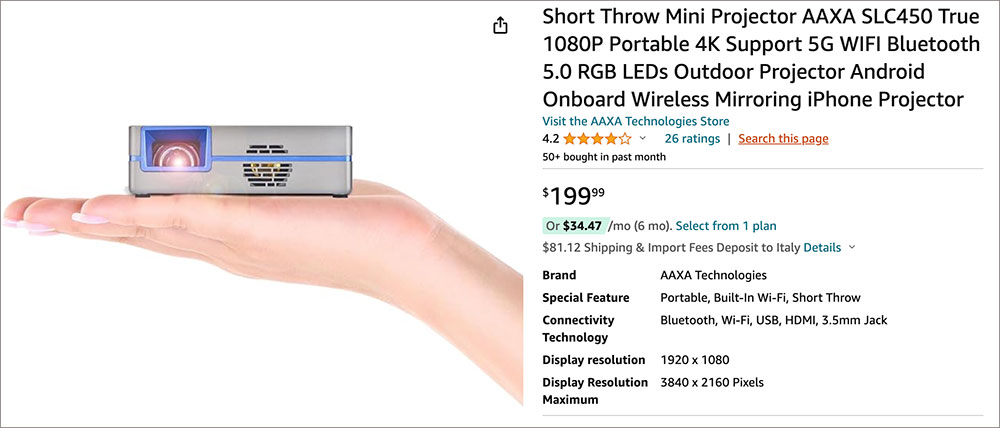
Sheredith helped me decide that a Short-Throw projector would be my best option. This type of projector doesn’t need to have a lot of distance between the lens and your fabric. So I purchased the Short Throw Mini projector AAXA SLC450 from Amazon for $200. I also purchased an Overhead Camera Mount Deskstand that I could clamp to my cutting table. In addition, I purchased a ceiling mount from Sheredith’s web site, should I want to attach the projector to my ceiling to be able to project more of the pattern at one time. The last thing I needed was a long HDMI cable to go from the projector to the computer, which fortunately, I already owned.

Setting Up
The set-up was quite easy. It only took a few minutes to mount the stand and then the projector. You won’t know for sure how high to adjust the stand/projector until you start projecting a pattern.
Creating the Pattern in Garment Designer
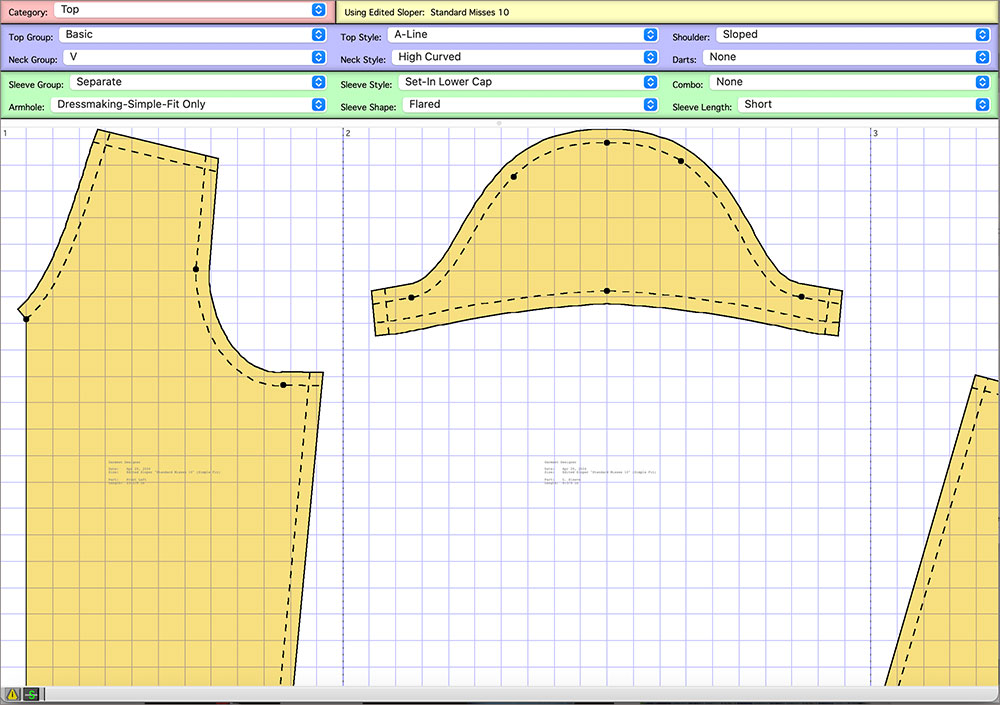
Garment Designer
I chose to do a simple top in Garment Designer for the first attempt at Projector Sewing. Once I had completed the pattern making (in under 5 minutes).
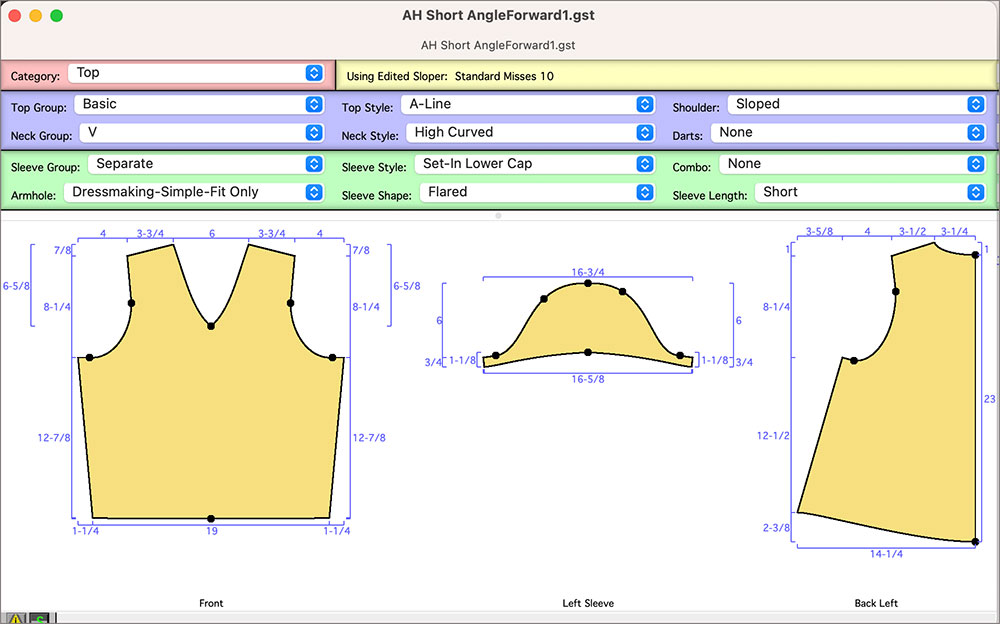
Generally, the process is as follows:
- I chose to only display half of both the front and back, as I would be cutting each on a fold. (Display>Pieces).
- Turn off the Dimensions (Display>Show Dimensions).
- Ensure that the grid is displayed so that you can use this to calibrate the scale (Display>Show Grid).
- Confirm how big the largest piece is (by clicking inside of it and looking at the Info Bar.)
- Set your Paper Size to be slightly larger than this (to allow for the seam allowances and hems. I set a custom paper size of 30” by 36” which is bigger than I needed, but I like to be safe. On the Mac, this is quite simple (using Page Set Up and Custom Sizes). On Windows, I would use a free utility called CutePDF or another called Bullzip).
Tip: You could choose a paper size that is half the width of your fabric if you are going to lay pieces on the fold. This facilitates the step in Adobe Acrobat later. - Display the pattern in Full Scale (Display>Scale to>Actual Size) and choose Display>Print Preview to confirm that the entire pattern piece fits on a single page. You will see one page per pattern piece.
- Save as a PDF.
Acrobat
Now you will load the PDF file into Adobe Acrobat and create a type of pattern layout. Initially, you will see that each pattern page has its own page, and so you will want to select and copy a piece from one page onto another page. This is why it is handy to have a wider paper size. We have a video on YouTube showing you how to do this, so click here if you want to watch it.
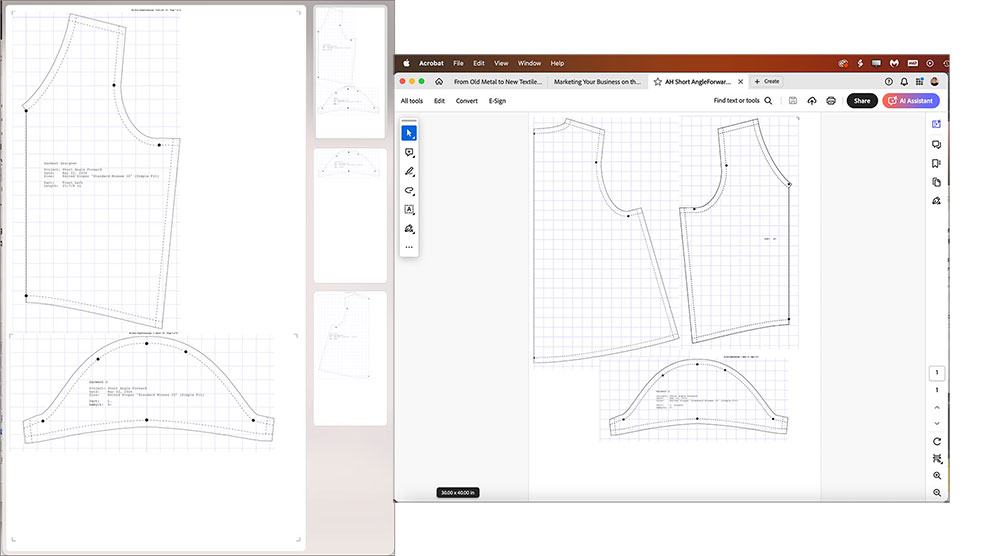
My Cross-Check
Because I am a cautious person, and I like to ensure that everything is to scale, I decided to also print out my pattern and create the paper version to use as a cross-check… at least for this first attempt at projecting a pattern.
Projecting the Pattern Onto Your Fabric
- You now need to connect your computer to the projector with an HDMI cable (or other dependent upon your setup).
- Open your pattern in Acrobat.
- Experiment with the projector’s position until you get your pattern projecting over the area you want to use to cut out your fabric. Now it is time to ‘calibrate’.
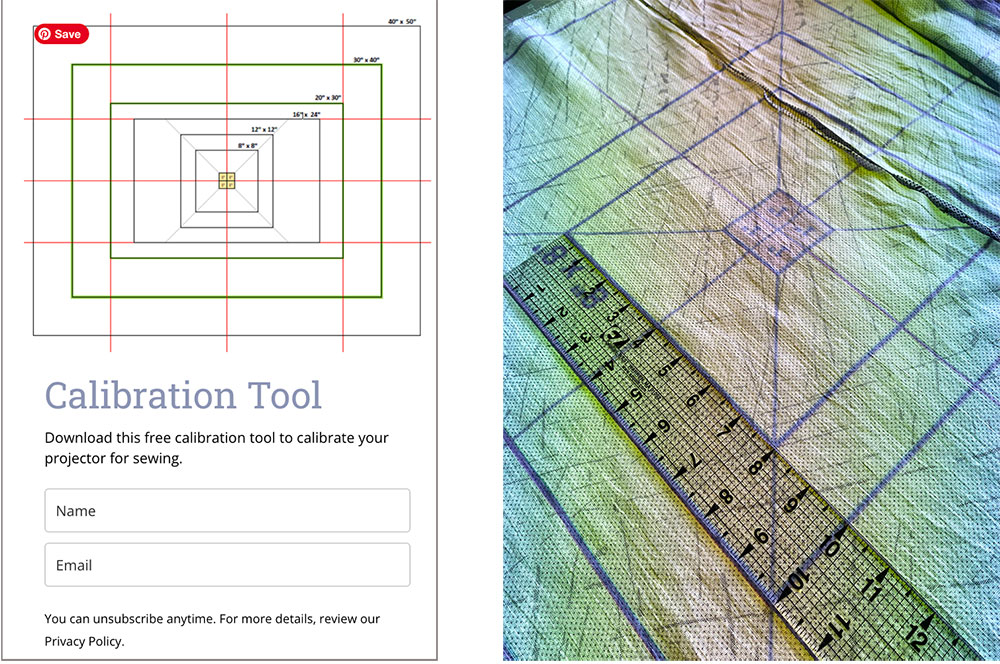
Calibrate the Projector
Calibration simply means that you are ensuring that the projection you are using is in the proper scale. The 1” grid from Garment Designer can assist you with this. There are however, various calibration images/tools that are available so that you can use them to project and image on your surface and make any adjustments to your projector and the scale of the PDF. Sheredith shares one such tool on her website that helps with the calibration process. There is also a new web-based tool that you can use which is pretty amazing. You can watch a video of this online. This tool allows for various things including inverting the color of your image, so the pattern is white instead of black (as might be necessary when projecting on dark fabric).
Tip: In Acobat you can easily scale the image of your pattern, even to decimal point degrees. It is easiest to use the keyboard shortcut for this. On the Mac it is Cmd+Y and on Windows it is Ctrl + Y.
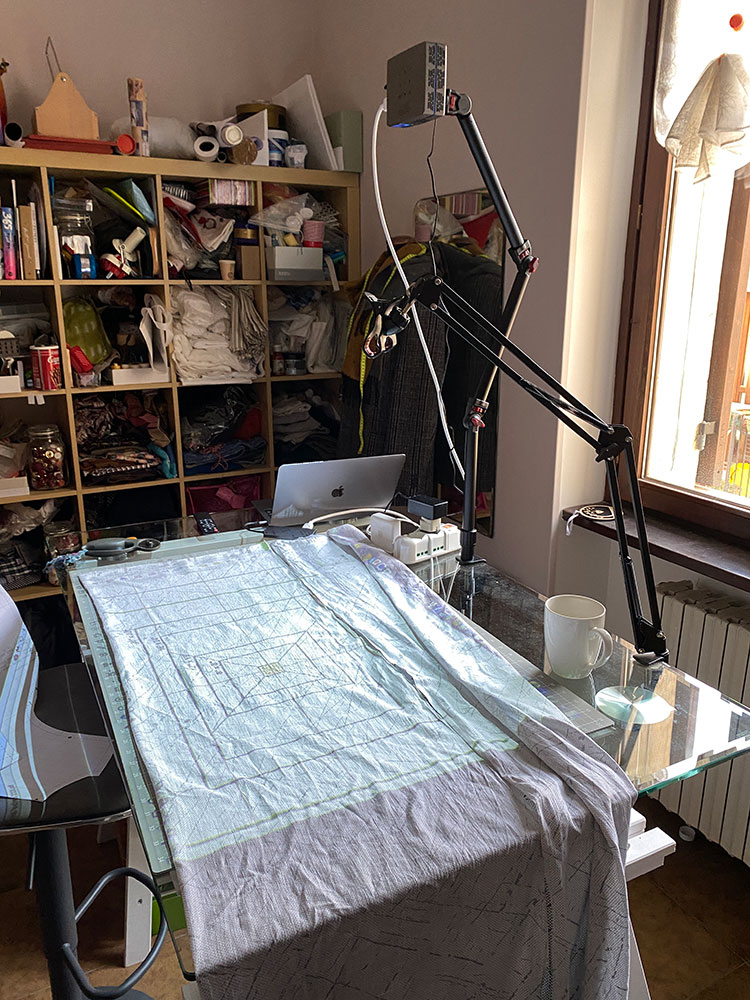
Once calibration with the projector/tool is complete and you display your pattern on your fabric, I would suggest a quick double-check to ensure that the display scale is accurate. Using the grid on the displayed image, make sure that it is accurately 1” square. The scientist in me pulled out the paper pattern I had created, and laid this on top of the projection to ensure that all was perfect.. and it was.
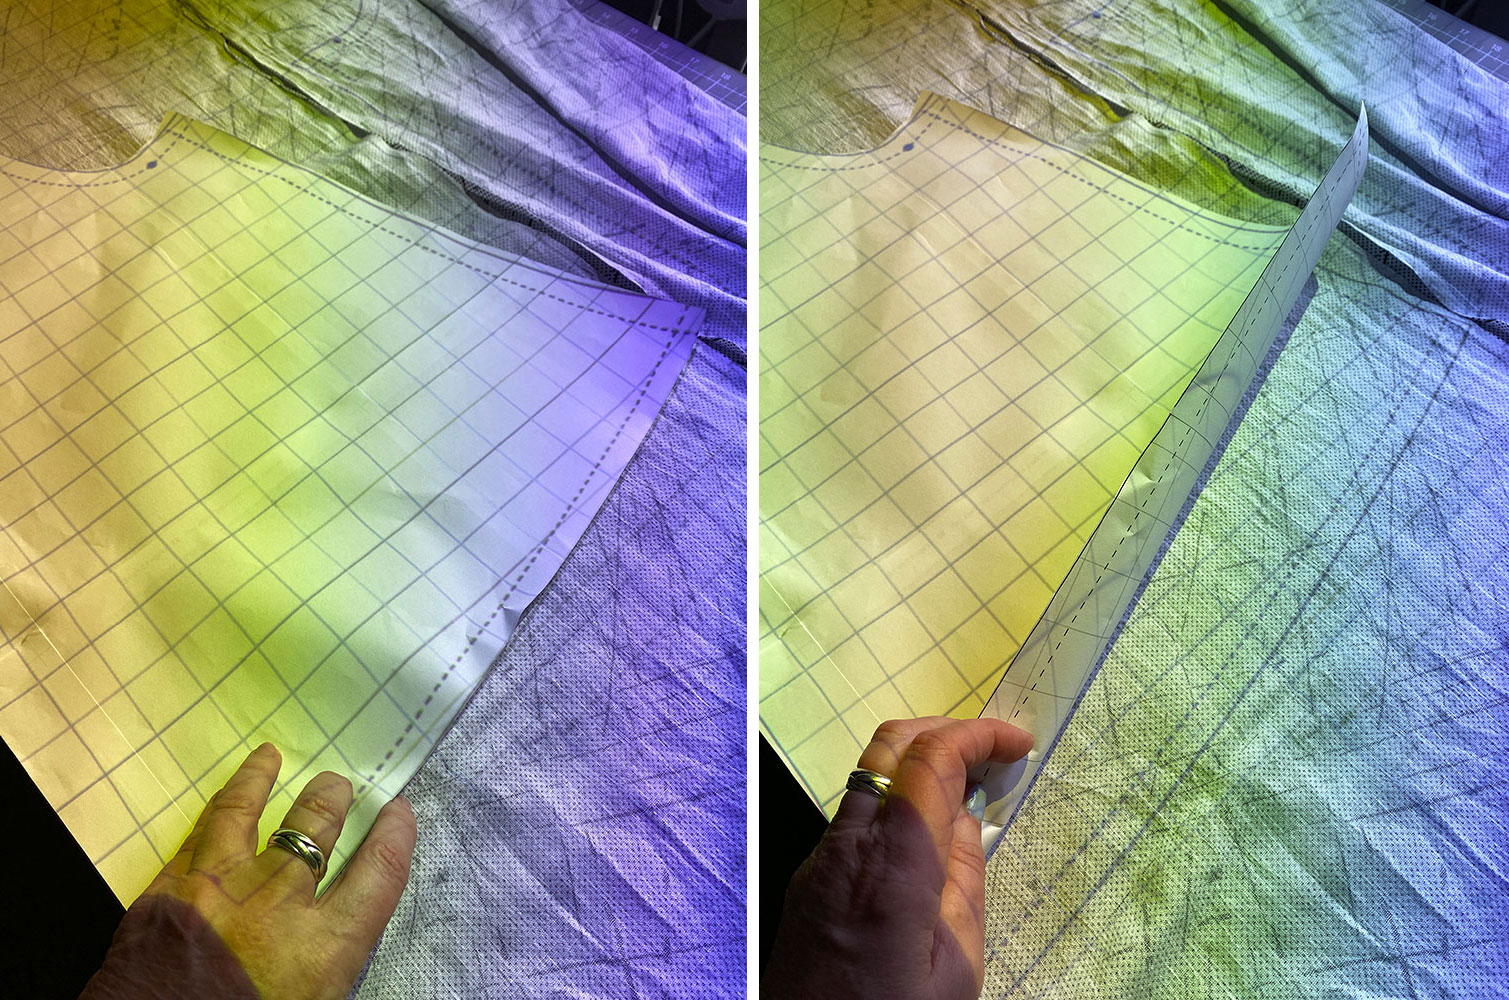
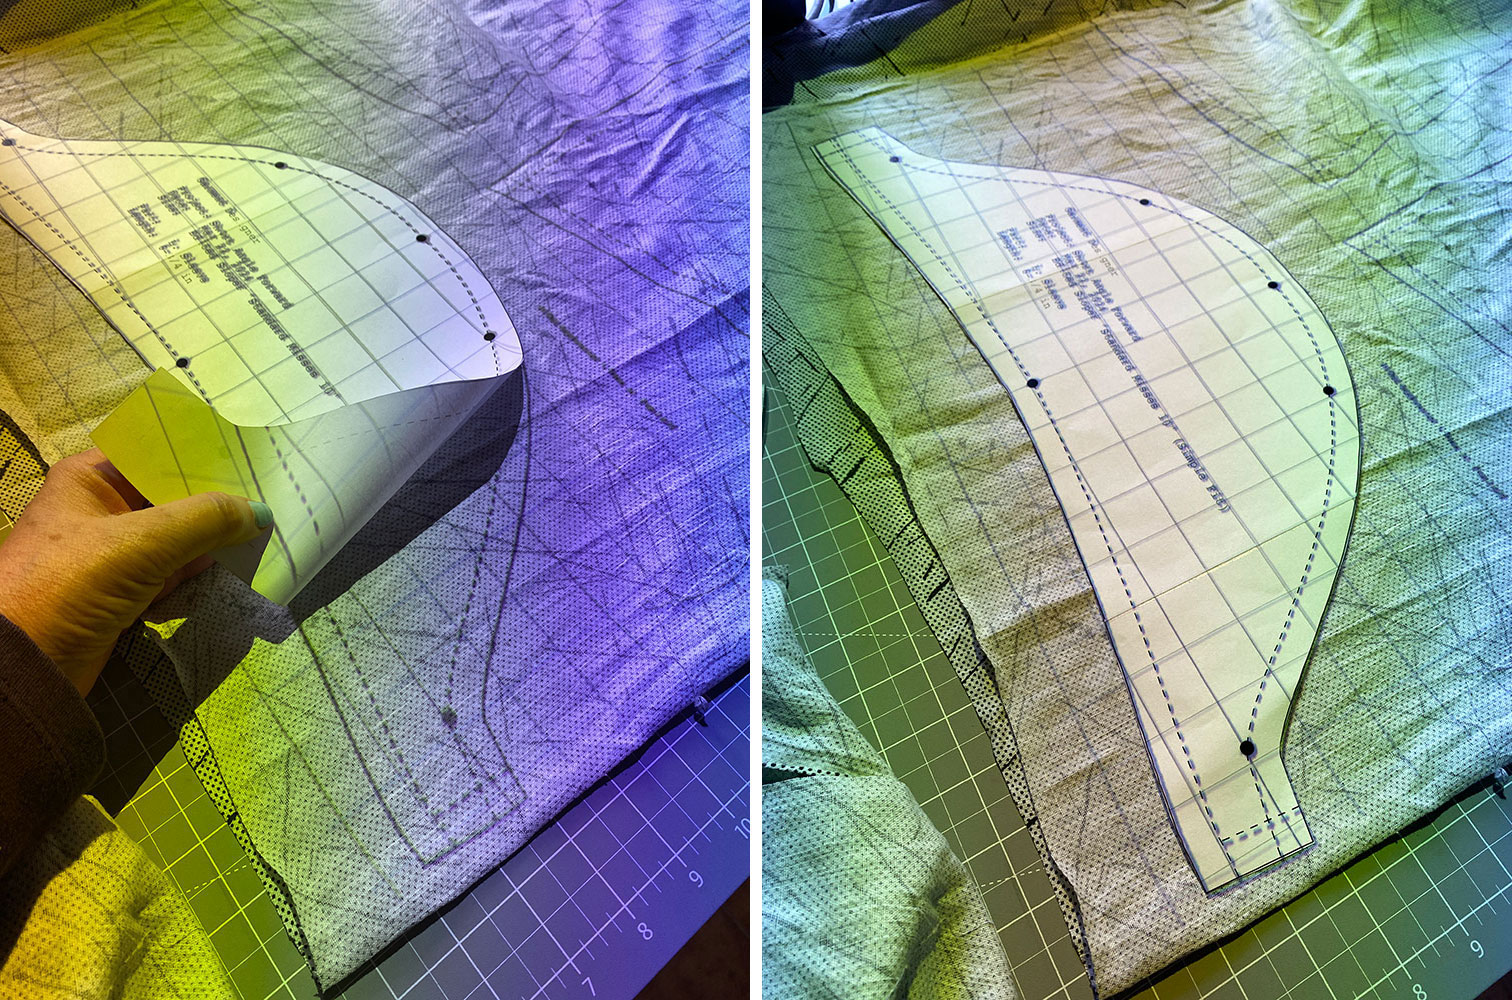
Positioning the Fabric and Cutting
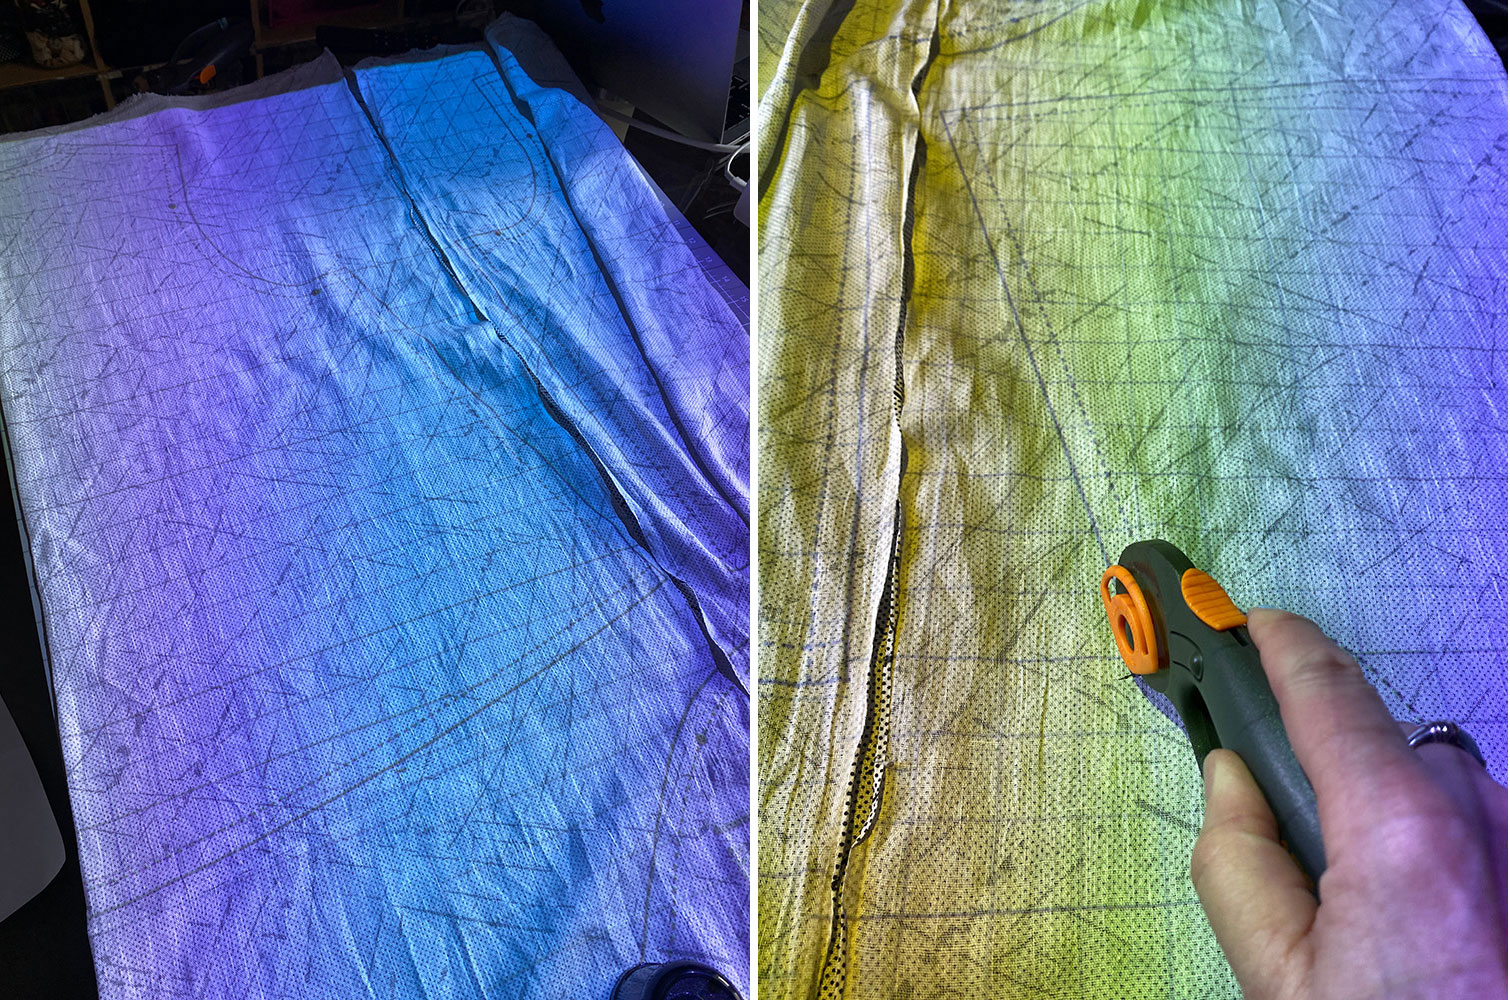
At this point, arrange the fabric as you have deemed proper. I cut two pieces on the fold, so I prepped my fabric for this. Know that you may have to reposition the fabric from piece to piece as you cut. How much you need to do this is based on how much you can project at one time.
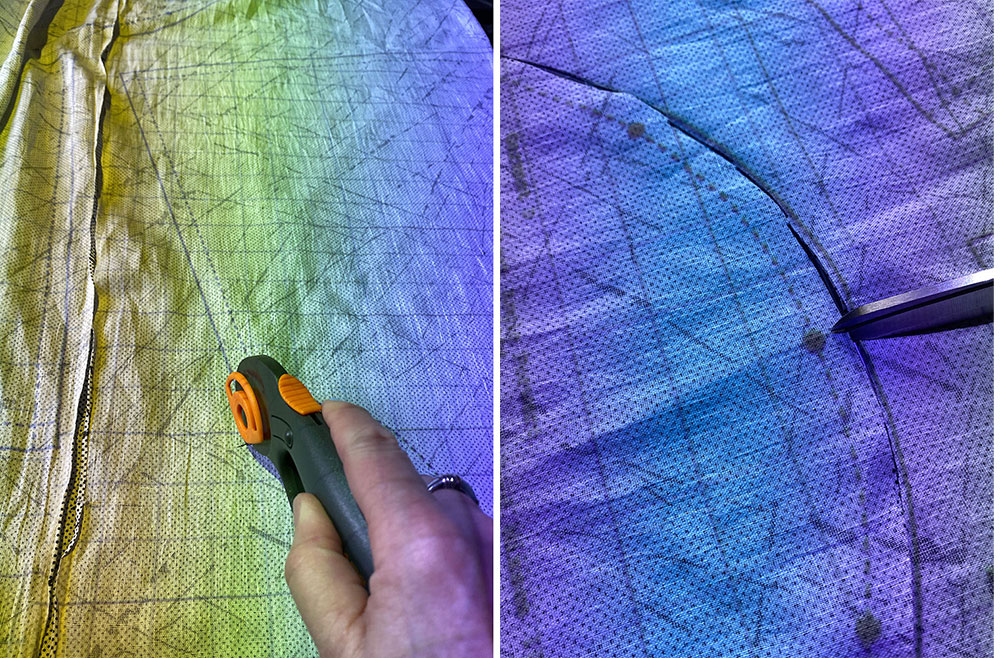
I used a rotary cutter to cut my pattern. It quickly became obvious to me that I would need a bit more practice with this, but overall, my accuracy was good. You can of course use scissors.
Sewing the Garment
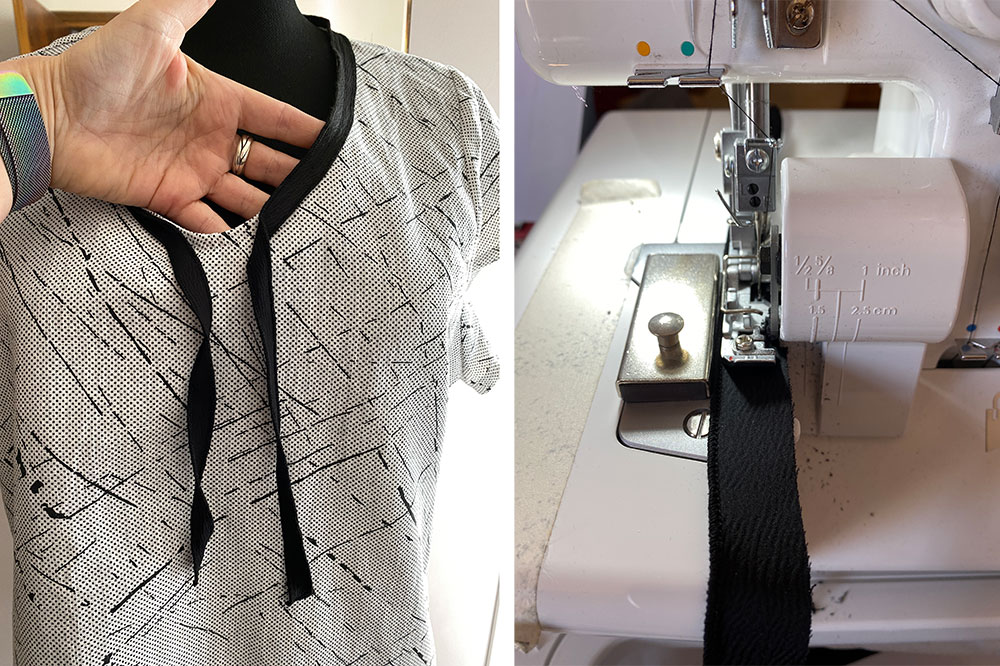
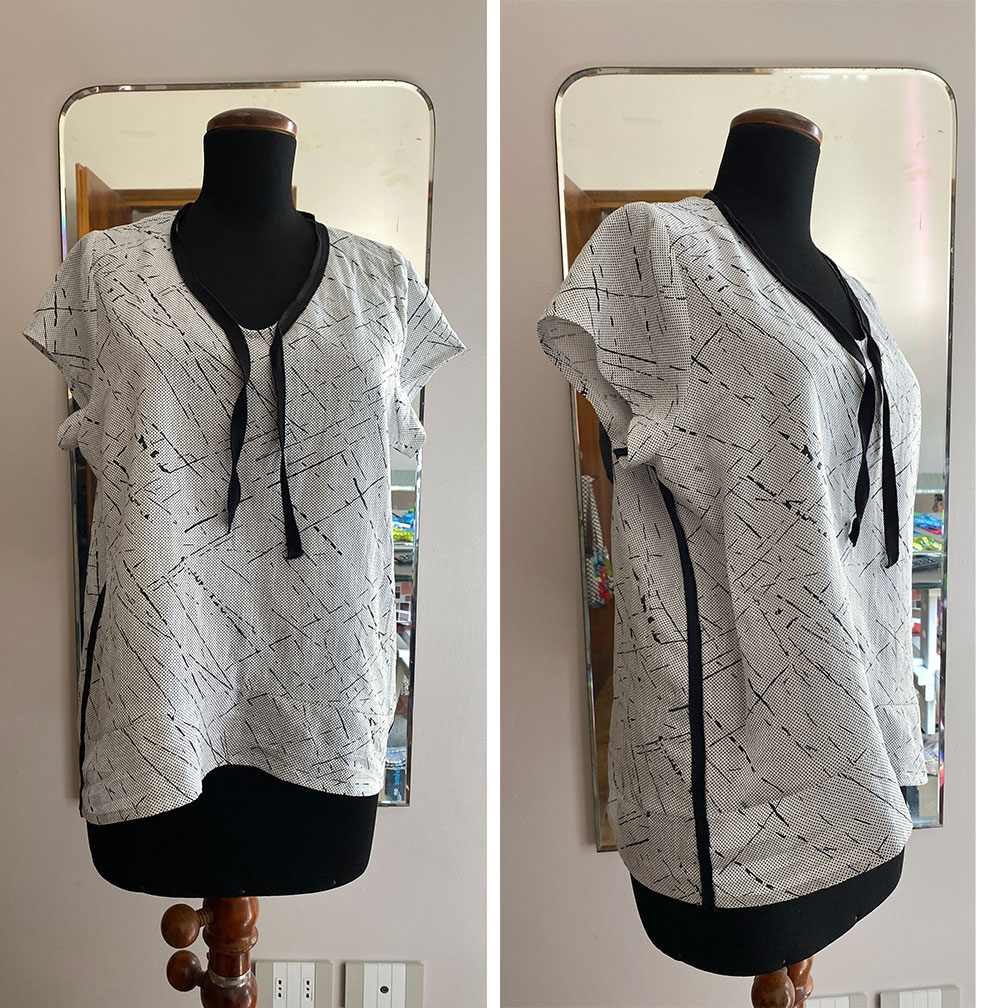
My top came together well. Since one of the design features was a forward side seam, I decided to accentuate it by sewing trim over the seam on the right side. I cut the trim from a sleeve of a garment I used for up-cycling. I then serged the two long edges with a narrow hem. I like to use a magnet on my serger when I serge the second side as this allows for a perfect parallel piece. I also added the trim to the neckline.
The only adjustment I made to the garment was to lengthen it by adding a band along the bottom. I decided it was too short… so, snip, snip, I created a 3” band which I sewed on to the hem. Below please see the finished project!
This project was so much fun! Garment Designer pattern making software has found yet another avenue for output. I now have traditional taping methods, a plotter, and a projector. I know I’ll mix it up according to the design.
~~ Susan, Cochenille’s Creative Director
Resources
Disclosure Note: We have linked some of the items below to Amazon as we are an Amazon Affiliate. Cochenille Design Studio is supported by its audience. When you purchase through links from our site, we may earn an affiliate commission.
Projectorsewing.com – a great resource to learn about projector sewing. There are articles, tutorials, and even a class you can take to help you make the decisions that are appropriate to your situation. Sheredith, the owner is amazing.
Projector – AAXA Technology, Short-Throw Projector Amazon
Table Mount Stand – Amazon
Ceiling Mount Stand – from Projector Sewing
FaceBook Projectors for Sewing Group –
Calibration
Patternprojector.com – an online tool that is great for helping you calibrate.