Program Compatibility Garment Designer
*When new Operating Systems are released by Microsoft or Apple, there is always a risk that our software may not be fully functional. Cochenille advises staying within the limits of program compatibility listed below:
Windows
GD 2.9.1 – Windows XP to Windows 11 (CURRENT VERSION using a Software Key)
GD 2.5.3 – Windows XP to Windows 11 compatible (RECENT PAST VERSION using a Hardware Key)
Macintosh
GD 2.9.1 – Mac 10.15 (Catalina) through Mac 14 (Sonoma) .compatible (CURRENT VERSION using a Software Key) (This is an updated 2.5 version that runs on Catalina and above).
GD 2.9 = Mac 10.15 (Catalina) through Mac 14 (Sonoma) .compatible (RECENT PAST VERSION using a Hardware Key) (This is an updated 2.5 version that runs on Catalina and above).
GD 2.5.4 – Mac 10.6 to 10.14.6 compatible
One can upgrade to version 2.9.1 of Garment Designer, in order to use a Software Key. You will need to return your hardware key first, so it is suggested you email for information.
If you have an older version of Garment Designer, such as version 2.0, you will need to purchase an upgrade. You must provide your Garment Designer Serial number in the notes section for your upgrade order to be processed.
Program Compatibility Stitch Painter
*When new Operating Systems are released by Microsoft or Apple, there is always a risk that our software may not be fully functional. Cochenille advises staying within the limits of program compatibility listed below:
SP 3 Windows – Windows XP to 10 (CURRENT VERSION)
SP 3.1 Mac –Mac 10.6 to 10.14.6 compatible (CURRENT VERSION)
Mac users:
Stitch Painter 3.1 for Mac is NOT be compatible with Mac OSx Catalina. We are currently working with our developer on creating a new compatible version of Garment Designer for Mac OSx Catalina, Stitch Painter 3 will follow and go into development after.
If you rely heavily on our software, we suggest you turn any auto- updates off and to check this page for information prior to running an OS update. You can also find updates regarding our software’s compatibility with Mac OSx Catalina on our Mac Catalina Compatibility Support Page.
If you currently own Stitch Painter 3 for Mac, please contact Info@cochenille.com with the name you registered your software with, Stitch Painter Serial Number and HASP Key ID for a courtesy update to the most current version of the software (version 3.1).
If you have an older version of Stitch Painter, such as Stitch Painter 2, you will need to purchase an upgrade. Please provide your Stitch Painter Serial number in the notes section for your upgrade order to be processed.
USB HASP key not working/HASP Driver Update
Please go to the following Support page for more information on the USB HASP key and Updates: http://www.cochenille.com/support/usb-hasp-key-driver-info/
Windows Users:
Do NOT update to any Hasp driver beyond version 8.15. Sentinel has removed items that Garment Designer needs. Please use the version 8.15 driver. You may download that here.
Mac Users:
You can use the following link to download the latest driver
https://sentinelcustomer.gemalto.com/DownloadNotice.aspx?dID=8589945156
About the Hasp Key
The USB HASP key must be plugged into the computer during software use, this protects our software from being shared illegally. If you do not have the HASP key, then you will be unable to access the software. The HASP Key, sometimes referred to as a dongle, allows your computer to recognize and open our software programs, please have it plugged in prior to opening the program. If you have a limited amount of USB ports, some users use a multi-port adaptor in order to plug in additional USB devices.
Hasp-Related Error Codes
Error 33 or H0009
If you are trying to access the Garment Designer program and receiving an ‘error 33’ message or ‘H0009’ this is a driver communication error. This means the driver for your HASP key has either not been installed, did not install correctly or needs to be updated.
Error E0009. (Windows folk)
This error occurs on Windows systems when Hasp’s driver is above version 8.15. Sentinel removed items from these drivers that Garment Designer needs. Thus, the solution is to uninstall the newer driver with the exact installer you used to install it, and then install version 8.15 of the driver. You can download that version by going the link below.
https://www.cochenille.com/Sentinel_LDK_Run-time_setup8.15.zip
This is a document we created to assist people who have installed a newer version of the Hasp Driver. Keep in mind that we wrote this when version 8.43 of the Hasp driver was released. If you are using a more current version such as 9.15, you simply follow along with the instructions but substitute your version wherever it says 8.43.
Installing a Driver Process
Please make sure to have the USB HASP key unplugged when installing the driver.
1. Unplug your USB HASP key and ensure you do not have any security settings or antivirus software enabled that would block the download and installation of the driver.
2. Click on the link to download the latest HASP Key Driver installer. Note that you must have browser pop-ups disabled for the download to begin.
Mac: https://sentinelcustomer.gemalto.com/DownloadNotice.aspx?dID=8589945156
Windows: https://www.cochenille.com/Sentinel_LDK_Run-time_setup8.15.zip
3. Once you open the link on your web browser, scroll to the bottom of the website page and click ‘I accept’.
4. Click on the link provided to download the installer file. Note that you must have browser pop-ups enabled for the download to begin.
5. Once you have downloaded the zipped file, it will be sent to your downloads folder. The unzipped or expanded file name will be Sentinel_Runtime.dmg for Mac and HASPUserSetup.exe for Windows.
6. Click on the file to open and then select ‘Install Sentinel Runtime Environment’
7. After the installation is complete, restart your computer.
8. Plug your HASP key in, wait for the light to turn on and then Open Garment Designer. We suggest waiting a few minutes after restart before plugging in the key, as some computers will not recognizes the changes right away.
The USB HASP key will need to be plugged in during software use. It does not have to be ‘ejected’ when you disconnect it. We recommend attaching a keychain to the key for easy location, remember losing it will lose access to the program.
Please view the following video to see how to update your Hasp key driver. Some of you might have difficulty doing this which may be dependent upon your computer security settings.
Cochenille software uses a USB HASP key for software protection, also referred to as a dongle. This key will need to be plugged into your computer during software use.
This key does not install or contain the program itself. To install the program please use the DVD provided with your purchase. If you do not have a disk drive, contact us at info@cochenille.com for a digital download link.
You must provide your program serial number and HASP key ID for a digital download.
The software manuals are an invaluable resource we provide to aid our users while learning our software. We highly suggest our users read the manuals in order to use our software to it’s fullest potential.
These manuals can be downloaded to a smartphone or tablet for viewing while working with the program.
Upon installation of the your software a .pdf file of your software manual will be located in the respective software folder. For example if you have Garment Designer, you can find the manual by going to your Garment Designer Folder after installation:
Mac: Finder > Applications > Garment Designer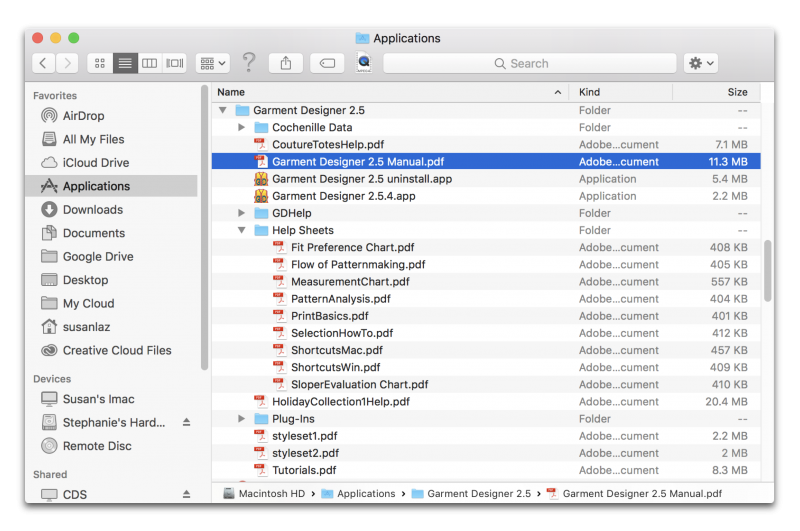 Windows Users can find their Garment Designer Folder in the C: Drive or on their desktop after installation:
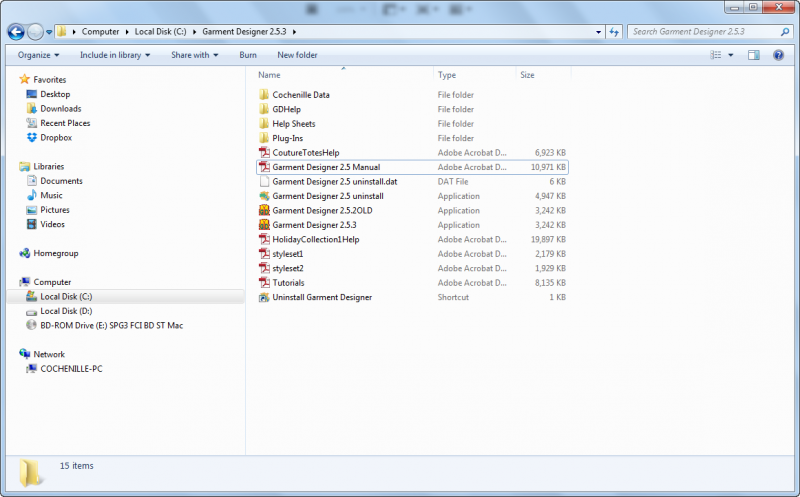
There is also an ‘abridged’ version of the manual if you go to the ‘Help’ menu option while in the program.
If you do not have a disk drive and would like to purchase our software, please contact us at info@cochenille.com for instructions on how to receive a downloadable version.
Our software will still require a USB port in order to plug in the USB security HASP key. The key allows permission to operate the program and must be shipped in order to access the program itself.
Alternatively, you can insert your program DVD on any computer with a disk drive to transfer the installer files to a USB storage drive. You can then use the file on the USB storage drive to install on the computer with no disk drive.
We no longer have any demos available for current operating systems, but we have demos for older operating systems still available for Garment Designer at the link below. Please check the compatibility of the demos. These are the only demos we have available: http://www.cochenille.com/garment-designer/garment-designer-demo/
If you find any demos or free trials available on other websites, these are not authorized demos by Cochenille Design Studio and downloading them may potentially be harmful to your computer.
Garment Designer does not export pattern files to vector or CAD formats. It is able to output pattern files into a .PDF format to be printed in whatever size the user chooses under ‘Page Setup’ in the File menu.
As a work-around, users can save their pattern as a .PDF on a large sized page setup scaled to ‘Actual Size’ and open the file in a vector graphic app, such as Adobe Illustrator, to tracing manually or by using the image trace tool.
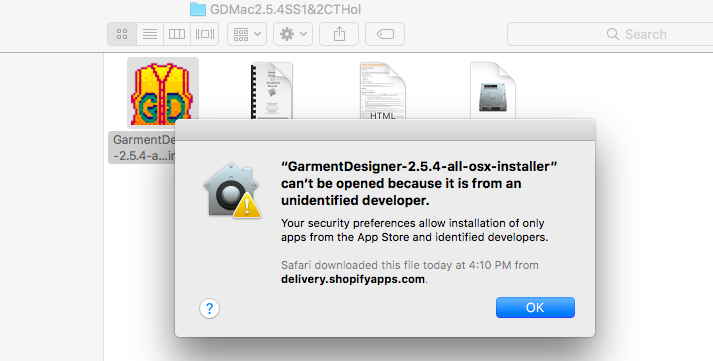
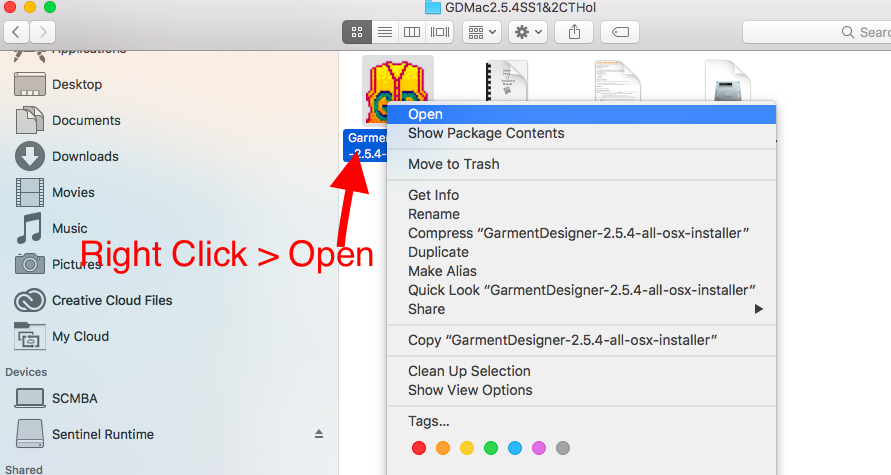
You will have to bypass a security setting on your Mac to allow the installation to proceed if you see a message similar to the one below:
Go to your System Preferences > Security & Privacy
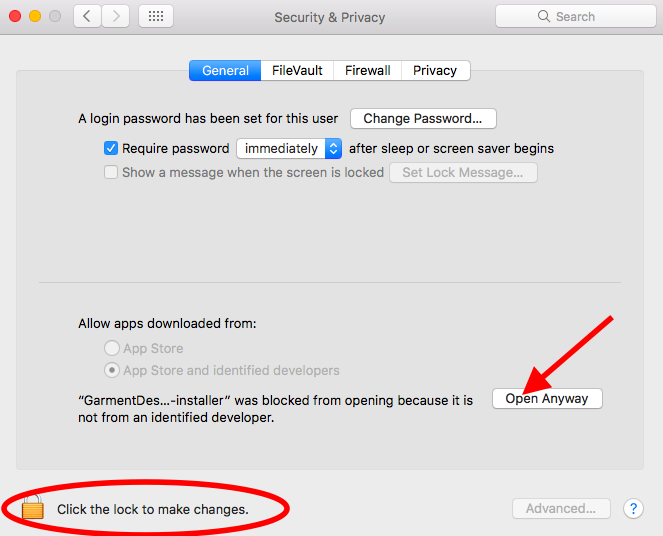
Click the lock to make changes > select ‘Open Anyway’
Some Mac computers that have Gatekeeper enabled will not show the ‘Open Anyway’ option. To temporarily disable Gatekeeper, right click on the .app file (control key+click if you do not have a mouse), then choose ‘open’
The uninstall file is located in your Garment Designer/Stitch Painter folder on your computer. Don’t forget to delete any icons on your desktop or dock if they remain, as these will be linked to the program.
For Mac users this folder will be found in your applications
For Windows Users this folder will be found in your C: Drive
Mac Users can also uninstall programs by doing the following:
- Open Finder. Click the Finder application, which resembles a blue face.
- Click Applications. …
- Find the program that you want to uninstall. …
- Select the program’s icon. …
- Click File. …
- Click Move to Trash. …
- Click and hold the Trash icon. …
- Click Empty Trash.
Windows users can also uninstall programs by doing the following:
- Click Start , and then click Control Panel.
- Under Programs, click Uninstall a program. …
- Select the program you want to remove.
- Click Uninstall or Uninstall/Change at the top of the program list.
If you plan on reinstalling the program onto a new computer, view the compatibility chart above to make sure your version is compatible with the operating system on your new computer. Please contact us if you have any questions at info@cochenille.com.
The company who supported the PECT numbers and unlock codes is no longer in business as of 2009. They were still giving support for a few years following until 2012 when the unlock codes were no longer available.
Back in 2009 we had to do an upgrade due to this and due to the changes in updated operating systems. We now use a USB security HASP key, sometimes referred to as a dongle, to operate our software. This must be plugged in whenever using the software.
You would need to purchase an upgrade for Garment Designer or Stitch Painter. With the upgrade purchase you will now receive a USB security key (which has taken the place of our unlock codes) and a program installation disk.
The files that are in the program folder are code files that are needed for the program to run, sometimes the computer will give it an icon for something that it isn’t like a movie or an excel file. The only files that you should double click on to open are PDF files or the actual application file.
Do not add any files to the folders that contain these files as it will cause issues with the program
Currently Garment Designer does not have the option to add or subtract points, or change straight/curved segments. You will not be able to cut through a style set.
As a work-around, if you wanted to add more points to achieve a style, you could try selecting a style with more points and then modifying the pattern to your style and fit preferences.
Style Sets 1 & 2 both contain certain styles with more points.
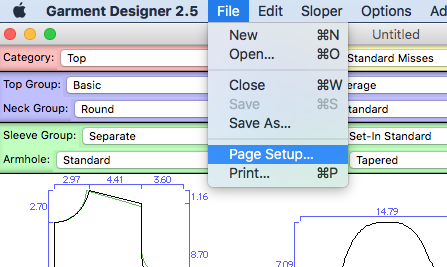
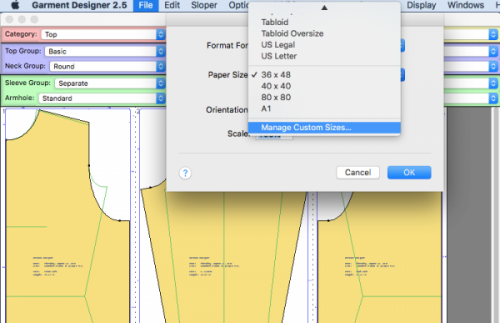
To resize your pattern to a larger size you will need to go to “File” and then “Page Setup” and set your paper size. You may need to set up a custom size if you do not see the paper choice you wish to use. Be sure to have the pattern scaled to ‘Actual Size’ under the Display menu.
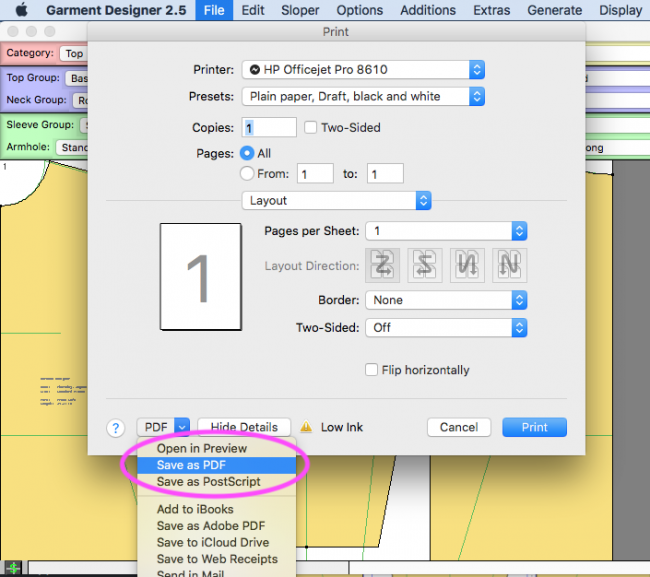
To save as a .pdf of Mac simply go to File> Print > Save As .PDF:
For Windows 10 users, simply go to File > Print > then select ‘Microsoft Print to PDF’ as the printer.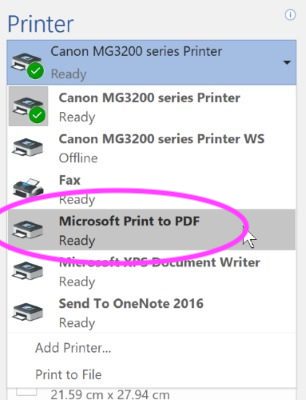
For older windows computers, you will first need to download the following link (or similar link) to be able to save to a PDF through your print option in Garment Designer:
http://www.bullzip.com/products/pdf/info.php
Before you save to PDF you will need to go to “File” and then “Page Setup” and set your paper size. Once you have done that you will go to “File” then “Print” and choose “Bullzip” as the printer. This will actually create a PDF so be sure to put the file where you can find it on your computer to print.
If you have a plotter printer you would then open the PDF and send it to that printer. You can also save that PDF file to a USB storage device to print at any local print shop that offers a large plotter printer, call them ahead of time to see what size to setup as your paper size. If you don’t have a memory stick you can always get the print shops email address and email to print.
View the Video:
Garment Designer does not nest graded patterns together, but if you are just looking to change the size for a given pattern you have already made on Garment Designer you can open the pattern, save a copy (for your new size) then select the new size (or change whatever specific measurements you would like to on the edit sloper menu) and it will update the pattern to the new size.
Garment Designer can display measurements in both inches and centimeters, you will find this setting under Options > Project Options:
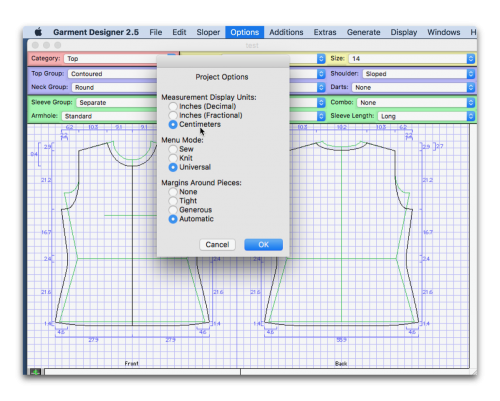
You can also change this to the default setting for when you open new documents in the program, please view the following video to learn how to do so:
You can display the dimensions of your pattern by going to Display > Show Dimensions.
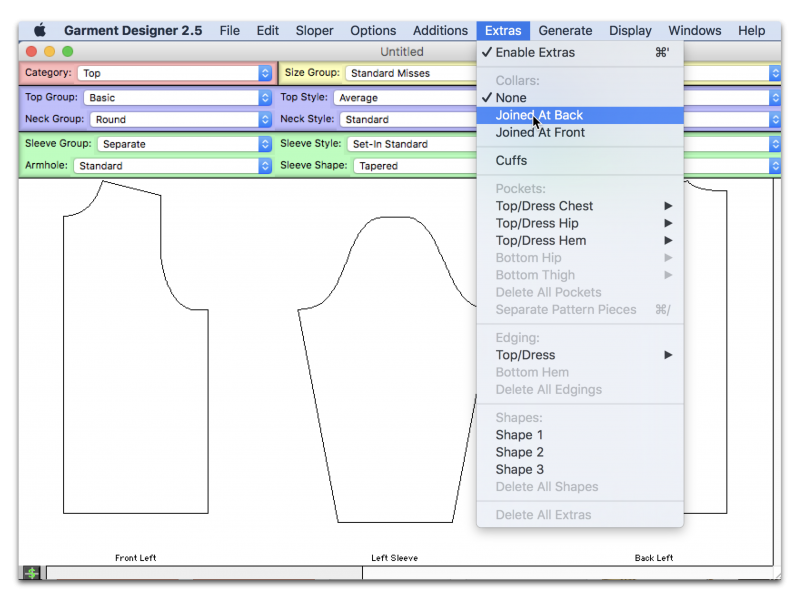
The hood is considered to be in the “Collar” group. Go to the Extras menu and under Collars you will choose” joined at back”.
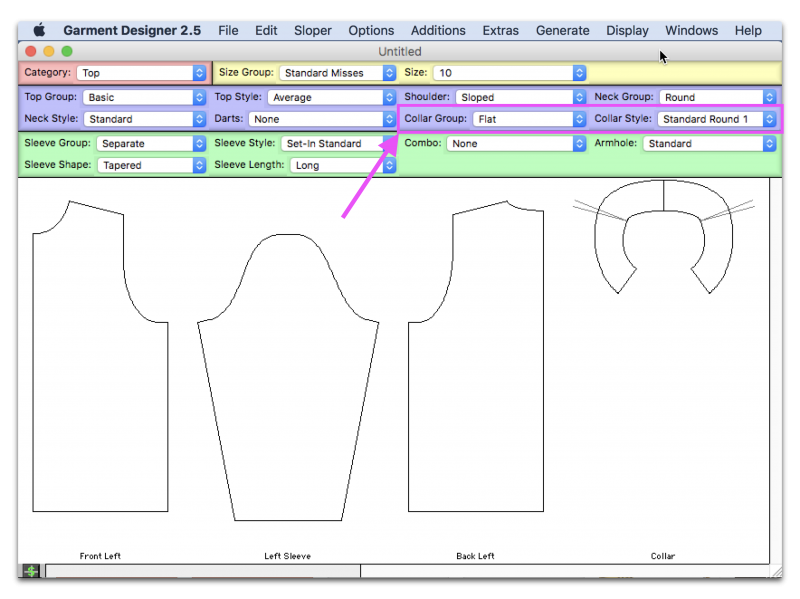
This will create a new menu option below. Under “Collar Group” you will choose “hood”. You then have 3 different “Hood Styles” to choose from.
Please see your Garment Designer manual in section 8-25 for more information.
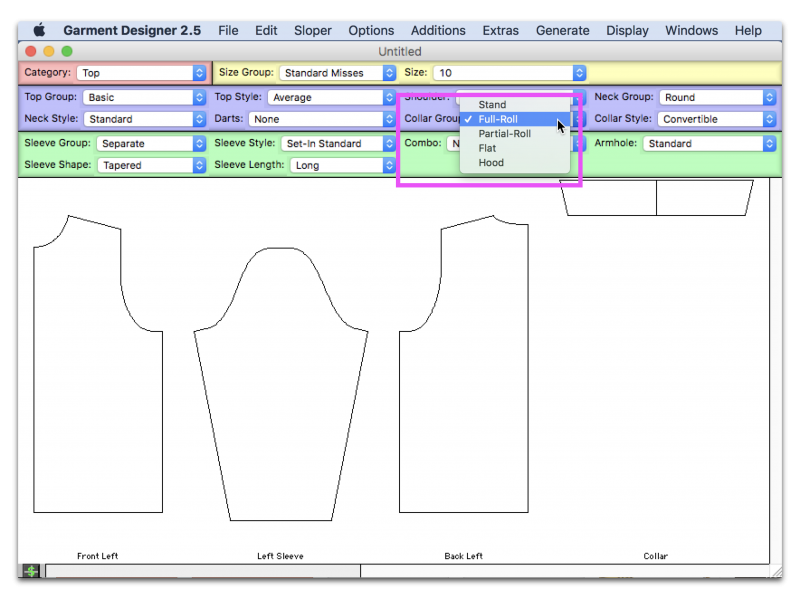
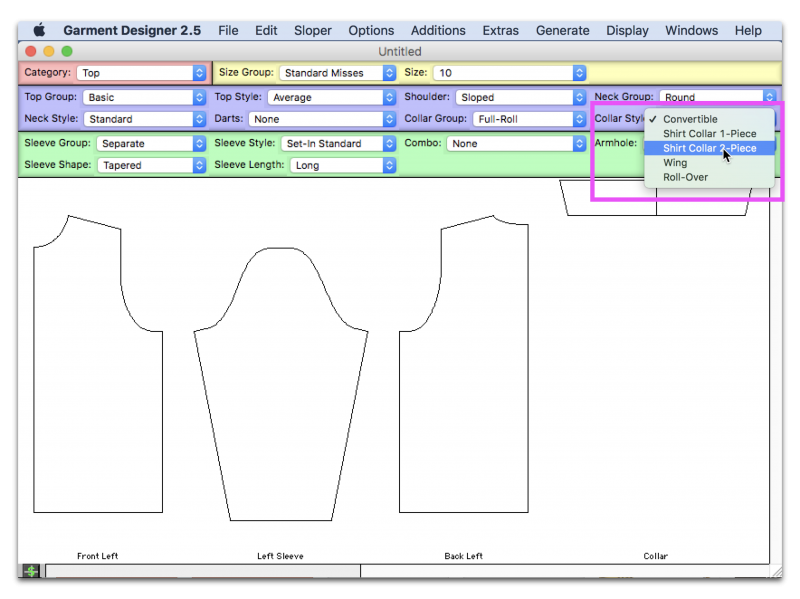
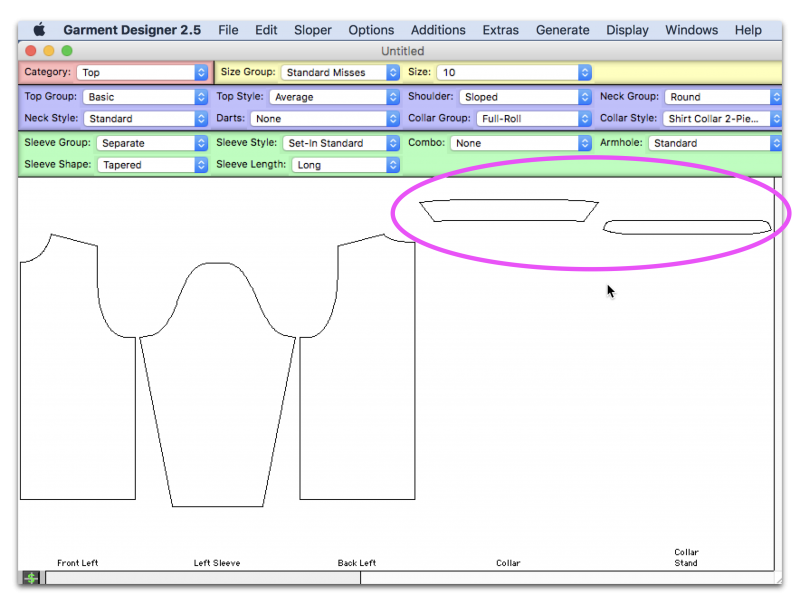
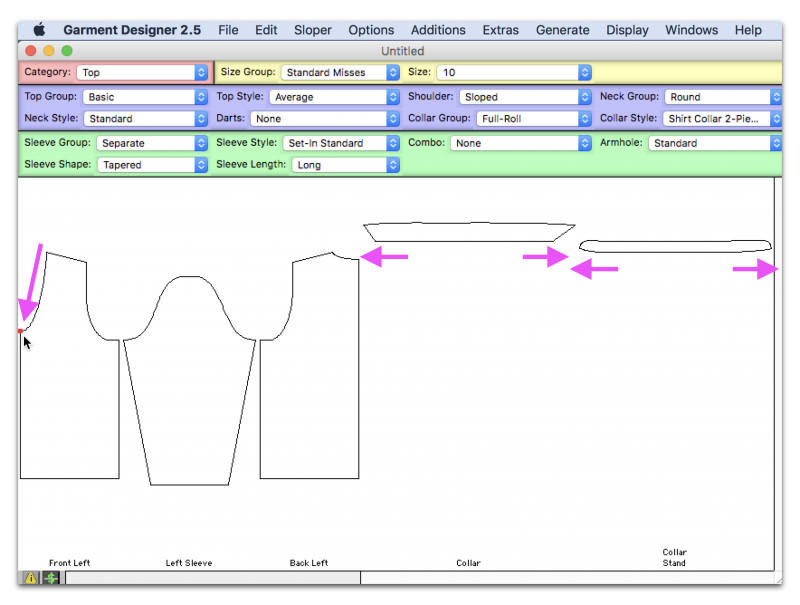
Go to the Extras menu and under Collars you will choose “joined at back”.
This will create a new menu option below. Under the Collar Group menu you will choose “Full Roll”. You will find the “Shirt Collar 2-piece” style under the Collar Style Menu.
Please see your Garment Designer manual in section 8-25 for more information.

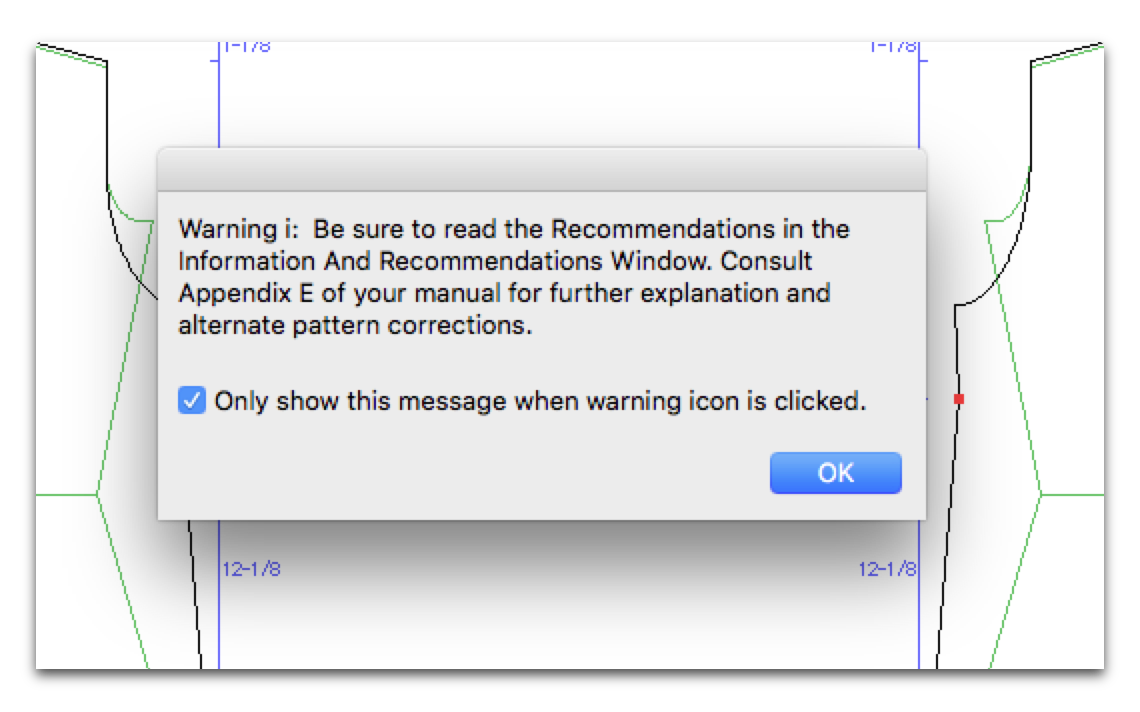
 Please watch the following video for more information and/or consult Appendix E in your Garment Designer manual:
This error message can come up for many different reasons.
Please email us at cdstech@cochenille.com or info@cochenille.com and explain to us what you were trying to do or what you were doing right before the message came up. You can also send your pattern file to use via email and walk us through what you were doing before the error message came up so we can try to recreate this message and find a solution.
This is a connection error (Basically the USB HASP key is not making the connection which is not allowing you to open the program.)
Please make sure to have the USB HASP driver installed or updated. You can find information on how to do this in our FAQ section.
• Make sure the key is plugged all the way into your port and the red light in glowing at the end of the key. Take your key out and plug it back in to be certain.
• Try several USB ports as you may have a port that has stopped working.
• Sometimes it can take time for your computer to acknowledge hardware that you have connected to your USB. Try waiting for 5 minutes before opening your program.
• You may also want to restart your computer again. You should have restarted after installing the update to the driver to allow your computer to fully recognize the changes
You are receiving error code H0009 because your HASP key driver was not installed or you need to install the most current version.
Sometimes when users install updates or users update their operating system it can cause the compatibility to be lost with the HASP driver, you would simply need to re-install or update the HASP Driver.
You can find information on how to do this above in our FAQ section.
Make sure that you are saving your file to a designated folder that you have created for your designs that is not located in your program folder and that you have the correct permissions to save to.
Please also ensure that your pattern name does not exceed 32 characters.
If the error message persists, please contact us at cdstech@cochenille.com
Check to see if you are using a valid shortcut, linked to a working Garment Designer application.
You can always delete the shortcut. Go to your program folder and create a new shortcut or alias to be sure you have a working shortcut.
On Windows this can also appear when a file has been corrupted or if the user has moved/copied program files around incorrectly. You can re-install the program or run a system file check to try and repair the corrupted file.
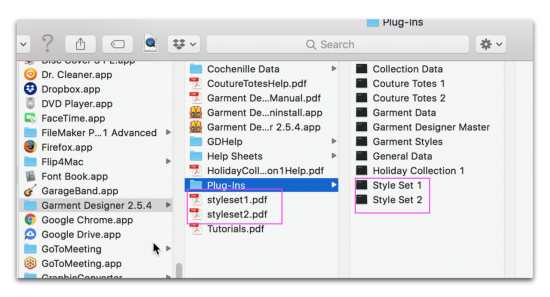
1. Go to your Garment Designer Application Folder
In this Garment Designer folder you should see Style sets 1 & 2 manuals. These would not be installed if they were not on your program disc.
You should also see two data files in your Plugins folder for Style Sets 1 & 2 (these will not open from this folder if they are clicked on, but are used by the Garment Designer program):
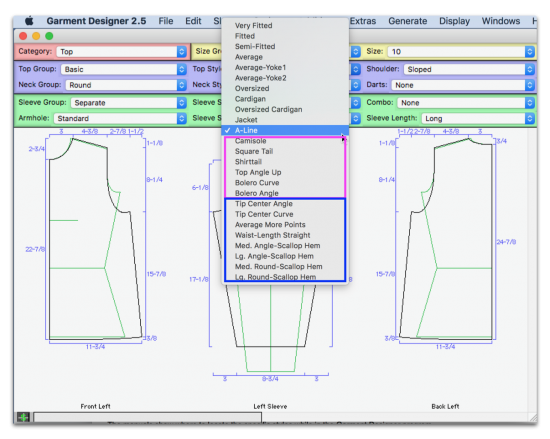
The manuals show where to locate the specific styles while in the Garment Designer program.
You can also open Garment Designer up and under the “Top Style” menu (while in the Basic Top group Category) you will be able to see some of the additional styles highlighted below:
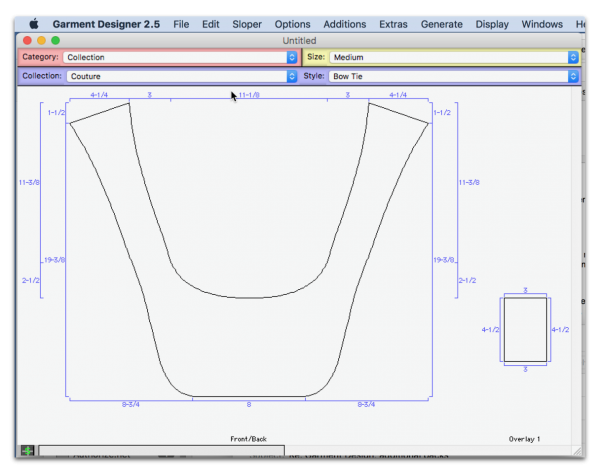
While inside the program you can view the Couture Totes or Holiday plug-in by selecting ‘Collection’ as the Category and then ‘Couture’ or ‘Holiday’ as the Collection: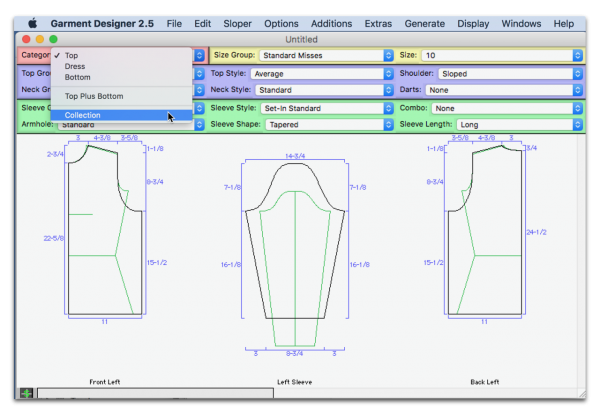
You can find the Manuals for these plug-ins in your Garment Designer Folder. The Couture totes manual will also contain sewing instructions.
If you would like to learn more about these plug-ins and how to purchase, please go to the following link:
http://www.cochenille.com/garment-designer/garment-designer-plug-ins/

The Tutorial Videos for Stitch Painter 3 are located on the Stitch Painter DVD you received with your order. You can watch them directly from the DVD.
You can insert the DVD and copy the file to your computer if you like, but it is a large file.
If you do not find Tutorial video’s on your Stitch Painter 3 DVD, please contact us at info@cochenille.com with your Stitch Painter 3 Serial number and/or HASP ID
If you have our other software program, Garment Designer, we do not have tutorial videos available on the DVD. You can find .pdf tutorials in your Garment Designer folder in the ‘Help Sheets’ Subfolder.
You can find other videos about Garment Designers at the link below:
http://www.cochenille.com/garment-designer/garment-designer-videos/
Cochenille Design Studio welcomes users to use Garment Designer software to develop and sell patterns of their own original design, using our software as a tool.
Exclusions to this include: Using our Collection patterns (such as Couture Totes, Holiday, Origami) and selling those. These collections have sewing instructions included and are considered to be our own pattern collection.
- Generate shaping charts for regular, top-down and sideways knitting
- Display Stitch and Row counts
- Knitters, Weavers and Stitchers may choose to input their gauge/sett/count and request shaping instructions for standard, sideways, top-down, and diagonal shaping.
- Generate shaping instructions in a row by row summary.
- Create a pixel-per-stitch graphic to take to Stitch Painter and other paint programs for design purposes.
- Print a full-scale, half-scale or quarter-scale pattern which may be used for sewing and for blocking knit pieces.
-
The choice to work in Sew, Knit, or Universalmode, thus customizing the menu and programfunctions to your needs.
-
Shaping instructions in a row-by-row summarywhich can be used by knitters or weavers.
-
A Yarn Calculator for knitters to determine howmuch yarn to purchase.
-
The option to display counts for each garmentpiece so that you have a visual reference ofstitches/rows. (Knit mode)
-
The ability to add ‘bands’ which may be used byknitters for ribbings/welts. (Knit mode)
Please view our Garment Designer Gallery on our website:
http://www.cochenille.com/garment-designer/garment-designer-gallery/
You can also find us on Pinterest:
Do you want to share your project with us and our followers? We would love to see what our creative customers are up to! Please email us pictures at info@cochenille.com, make sure to include a little bit about your project. We would be thrilled to hear how you use the software.
Garment Designer can not import or open any external files. Garment Designer will only open Garment Designer pattern files and will only save Garment Designer pattern files. PDF’s of the patterns can be saved from Garment Designer.