In my blog entry of November 17, 2025 (Pattern and Clothing Design with Variations on a Theme), I discussed how to create base clothing patterns using Garment Designer software (or your pattern collection) and then create variants from the base.
In this blog entry, I would like to demonstrate this strategy visually, by providing multiple examples of garments I have created using one pattern as the base.
My Base Style: The Cap Sleeve A-line Silhouette
My go-to style for garment patterns is generally a cap-sleeve, A-line garment. Why? The silhouette suits my figure, and the cap sleeve covers the upper arm, which I like for various reasons. The bonus is that the garment is quick to cut and sew or knit.
Building the Master
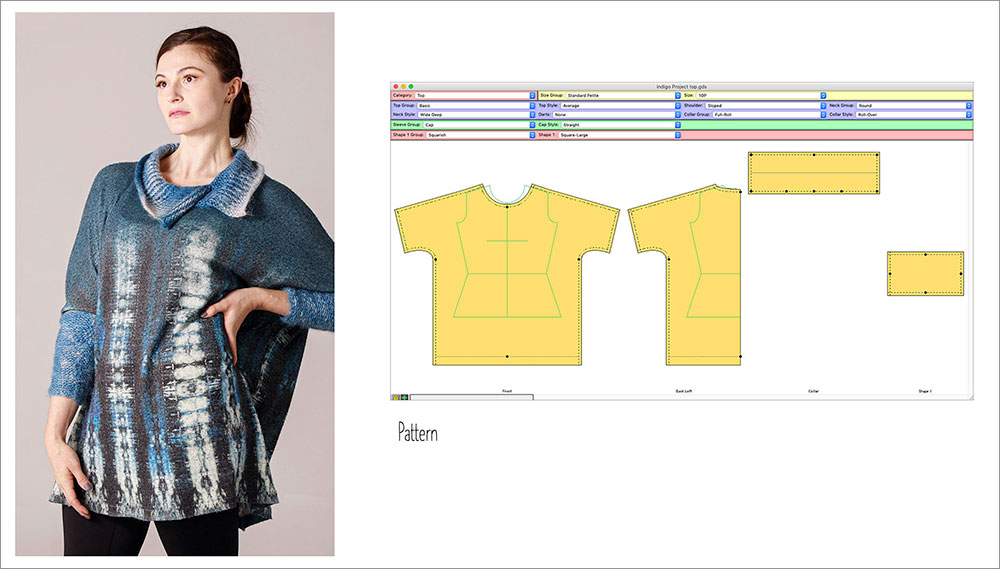
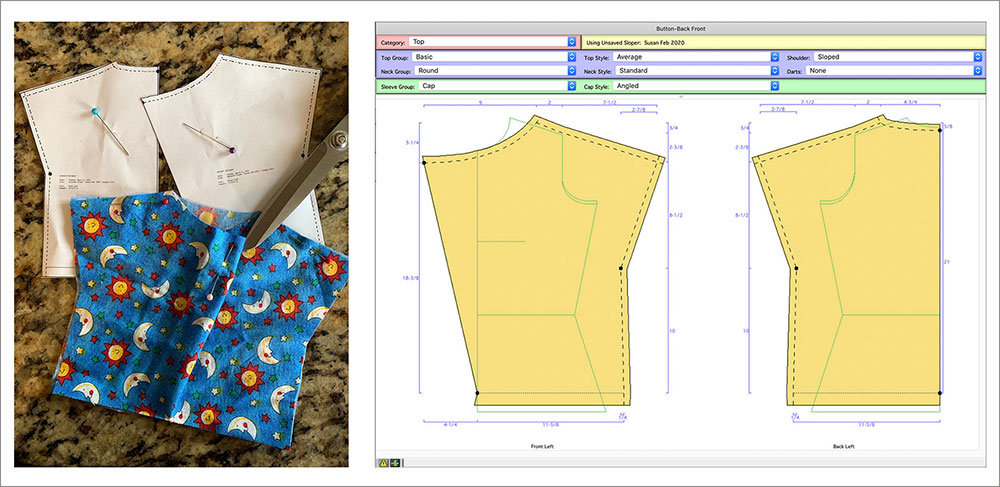
The pattern below is the one I used to establish a master base pattern. I made it finger-tip length (a favorite tunic length for me). The Shibori top was created using this pattern.

Below I am listing the details of the garment, and how each can be altered to create a further style:
- Straight Cap Sleeve – this can be varied easily by how long the shoulder and cap become
- An A- line Silhouette – this can be varied in width for fashion style
- A Wide Round Neckline – which can be easily varied
- Finger-tip Length – this can be varied from cropped to long
- I made it finger-tip length (a favorite tunic length for me).
Variations on a Theme
Now, I will walk you through variations of the base pattern and tell you the simple changes I did in each case. Sometimes I would use the same pattern for a different garment, changing up the fabric.
Variation #1: Add Ruffle Features

For this variation, I elongated the cap a little and then added a deep ruffle for the sleeve by creating a rectangular piece (using Generic Shapes). I also added a narrow ruffle at the neckline.
Variation #2: Capped Dress

For this variation, I minimized the amount of cap just a little and lengthened the garment to be a dress length (albeit short). Want to read more about the process of design? Click here to see a blog entry.
Variation #3: Yoke Style Top

For this garment, I used the ‘facing’ feature of Garment Designer to define a yoke line. Once I printed the pattern, I straightened the shape a bit and then separated the two pieces. I cut the yoke pattern out of a solid fabric and then stamp printed it to continue the motif you see on the base fabric.
Variation 4: Widened Drapey Top with Added Sleeve Length
To design the above garment, I elongated the cap slightly, widened the garment and straightened the side seam. Next, I added a collar using the Collar function. I also added lower sleeves, using the Generic Shape feature of Garment Designer. I shibori-dyed mohair yarn with indigo, and then machine knit the collar and cuff. Garment Designer could take the gauge I had input and tell me how many stitches and rows to knit.
Variation 5: Widening the Garment and Creating a Curved Hem
For this style, I had to push a little. I needed a curved hem. So, I switched the body style to a Bolero with a curve and then widened the garment. Lastly, I tweaked the lower hem to create the ‘tips’ and arc the curve. I used a fluid knit fabric and bound the neck edge with fold-over elastic.
Below you can see another garment made with the exact same pattern.

For this project, I utilized the pattern as a template and cut up pieces of knit clothing to fill in the space. You can wear the garment front-to-back or back-to-front. You can learn more about the process by reading an earlier blog entry.
Variation #6: Fleece Jacket

This jacket was a study of fold-over trim. To begin, I used the Shoulder Princess style which involved a few things like closing the shaping of the princess seam and straightening the side seam. I then elongated the cap sleeve a lot, and added a hood and pocket (both found in the Extras menu).
Lastly, I used Symmetry and click and drag to help me create the asymmetrical front closure. For the sewing steps, I created what felt like miles of leather-look knit trim (1″ wide) and pressed a crease in the center. Then, I bound all the edges.
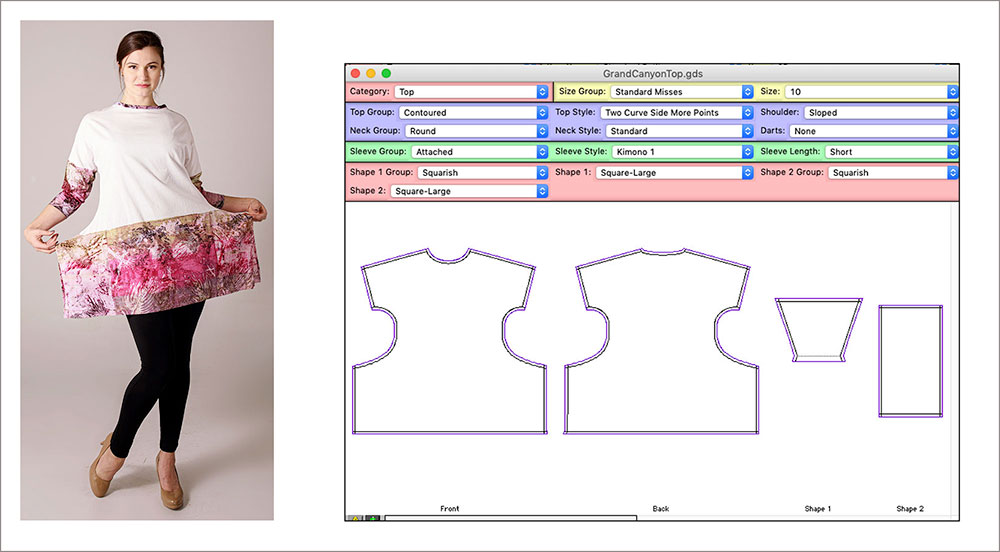
Variation #7: Squared-Off Bottom

The top of this garment is pulls from my standard base. The lower part however deviated from the typical A-Line. Although I used the Kimono sleeve style, it is a cap. The body style was changed (Two Curve Side with More Points) and stretched out the lower side seam. I also added a lower sleeve pattern by using a Square generic shape and narrowing the lower part to move inwards at the cuff.
I created a full-scale PDF pattern and took that into Adobe Photoshop, where I laid imagery of one of my photographs of the Grand Canyon into it. Then, I sent the entire file to Spoonflower to be printed. It was a fun combination of skills.
Using the same pattern I create the garment below.
For the above garment, I used a screen-printing technique called Deconstruction Printing. I was taking a workshop with Kerr Grabowski and I wanted to incorporate it into a garment. This was a little tricky as no two prints of the screen are the same as the image breaks down a little further each time. Still, I had fun with it.
Variation #8: Two-Piece Dress
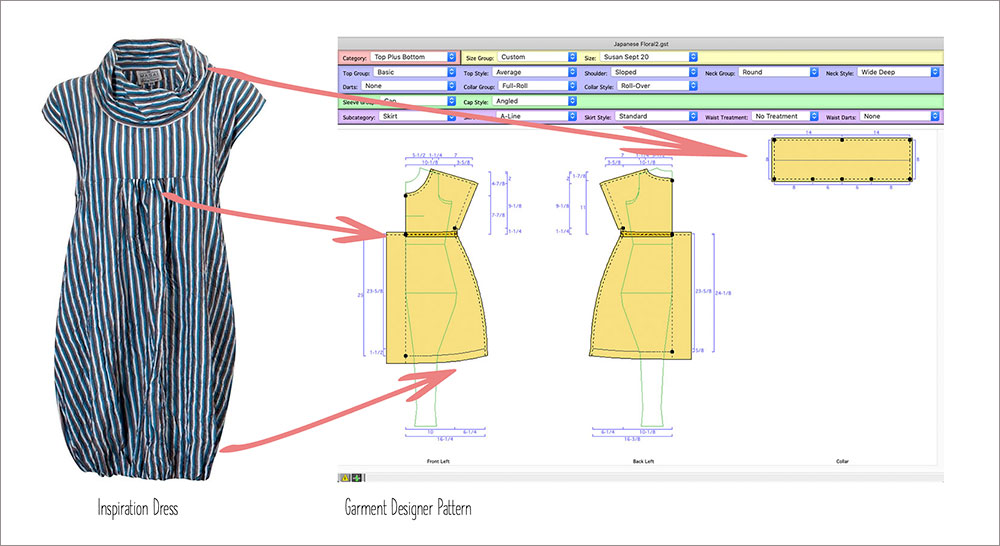
I had purchased a great fabric on a trip to Japan thinking it would make a great dress and so when I saw the image of the garment on the left above, I knew it was the right style. Starting with the base pattern, I only used the top of my Cap Sleeve basic garment, (setting them length very short so it ended above the waist). I widened the neckline and lowered it at center (both front and back) and then chose the Roll-Over collar which I widened.
To create the skirt of the dress with added fullness at the center, I chose the A-line skirt style and widened it a bit. To allow for the gathers at the center front and back, I added an extension. I used elastic to gather in the hem a bit. Below you can see my version of the garment.

Variation #9: Fold-over Top

I saw a garment on Pinterest that sparked my interest. The result is above. This garment was made from left-over fabric from a dress project. Because I was a bit uncertain if my concept would work, I printed out a 1/4-scale pattern and cut it out of fabric.
Variation #10: Lantern-Style Hem for a Cap Sleeve Dress
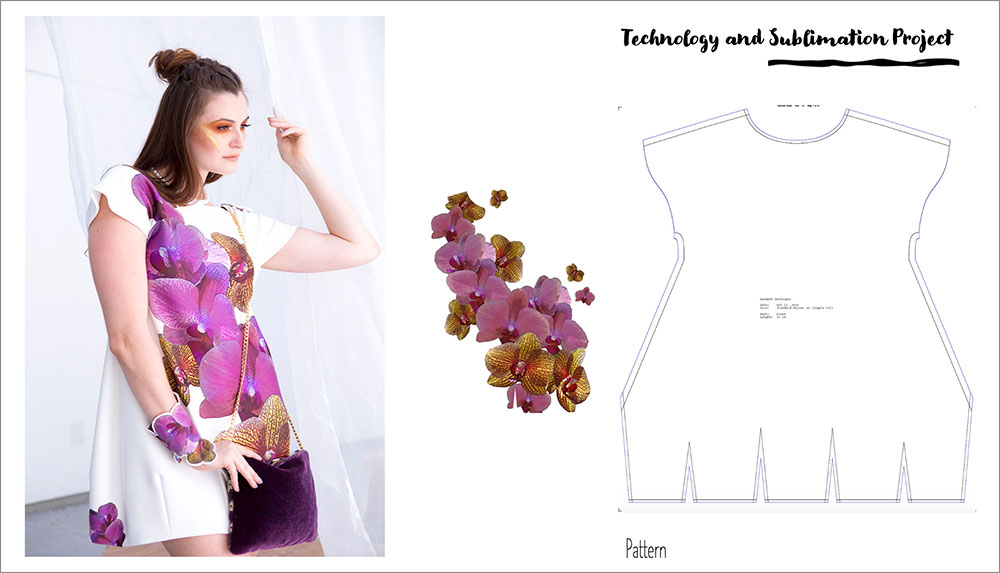
This dress was an endeavor in many ‘new things’ for me.
- I created the hem of the dress by coding it in Garment Designer (I am the programmer of that part of the program). This style is not released yet, so let me know if you like it.
- I then took a photo of orchids and reworked it in Photoshop with filters. Then, I laid it into a full-scale PDF of the garment patterns. Off it went to Spoonflower for printing.
- I utilized electronics (a new things for me) by creating a bracelet with electronic sequins.
I changed the cap sleeve to be the Curved (with a style change) and shortened the length of the cap. All-in-all, it was a challenging but rewarding project.
In Summary
So, you can see by the above, how easy it is to take a created style, and vary it to get many different looks. One is only stopped by their imagination or their sources of inspiration. Do consider pushing yourself to expand a style over time, creating variations on a theme!
~~ Susan, Cochenille Design Studio ~~